Why Grow Perennial vegetables. - My Productive Backyard

August 24, 2021

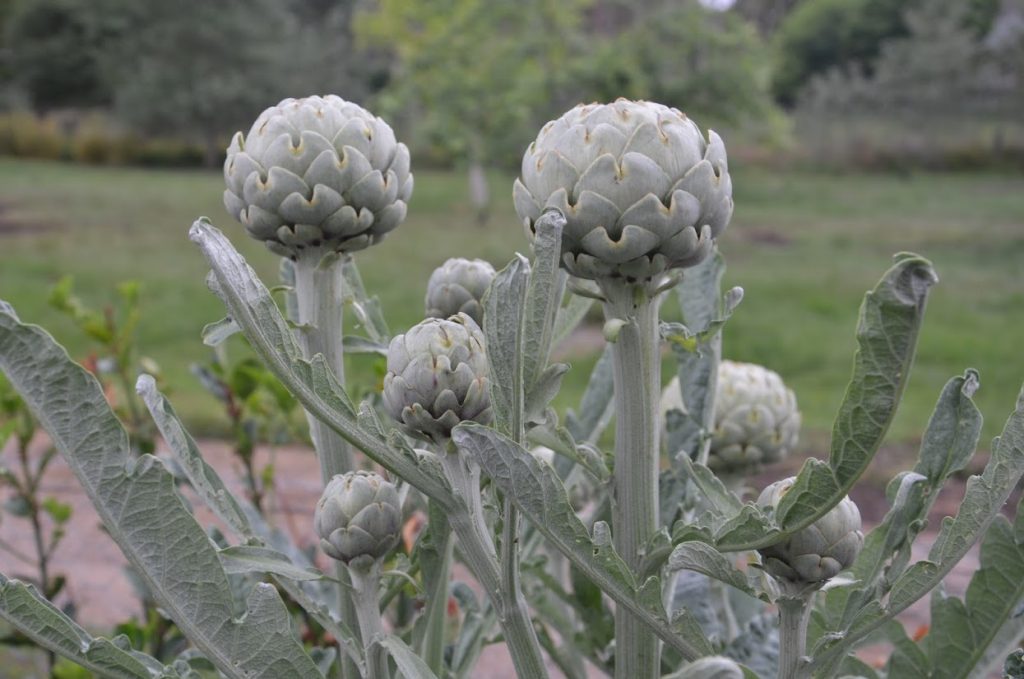
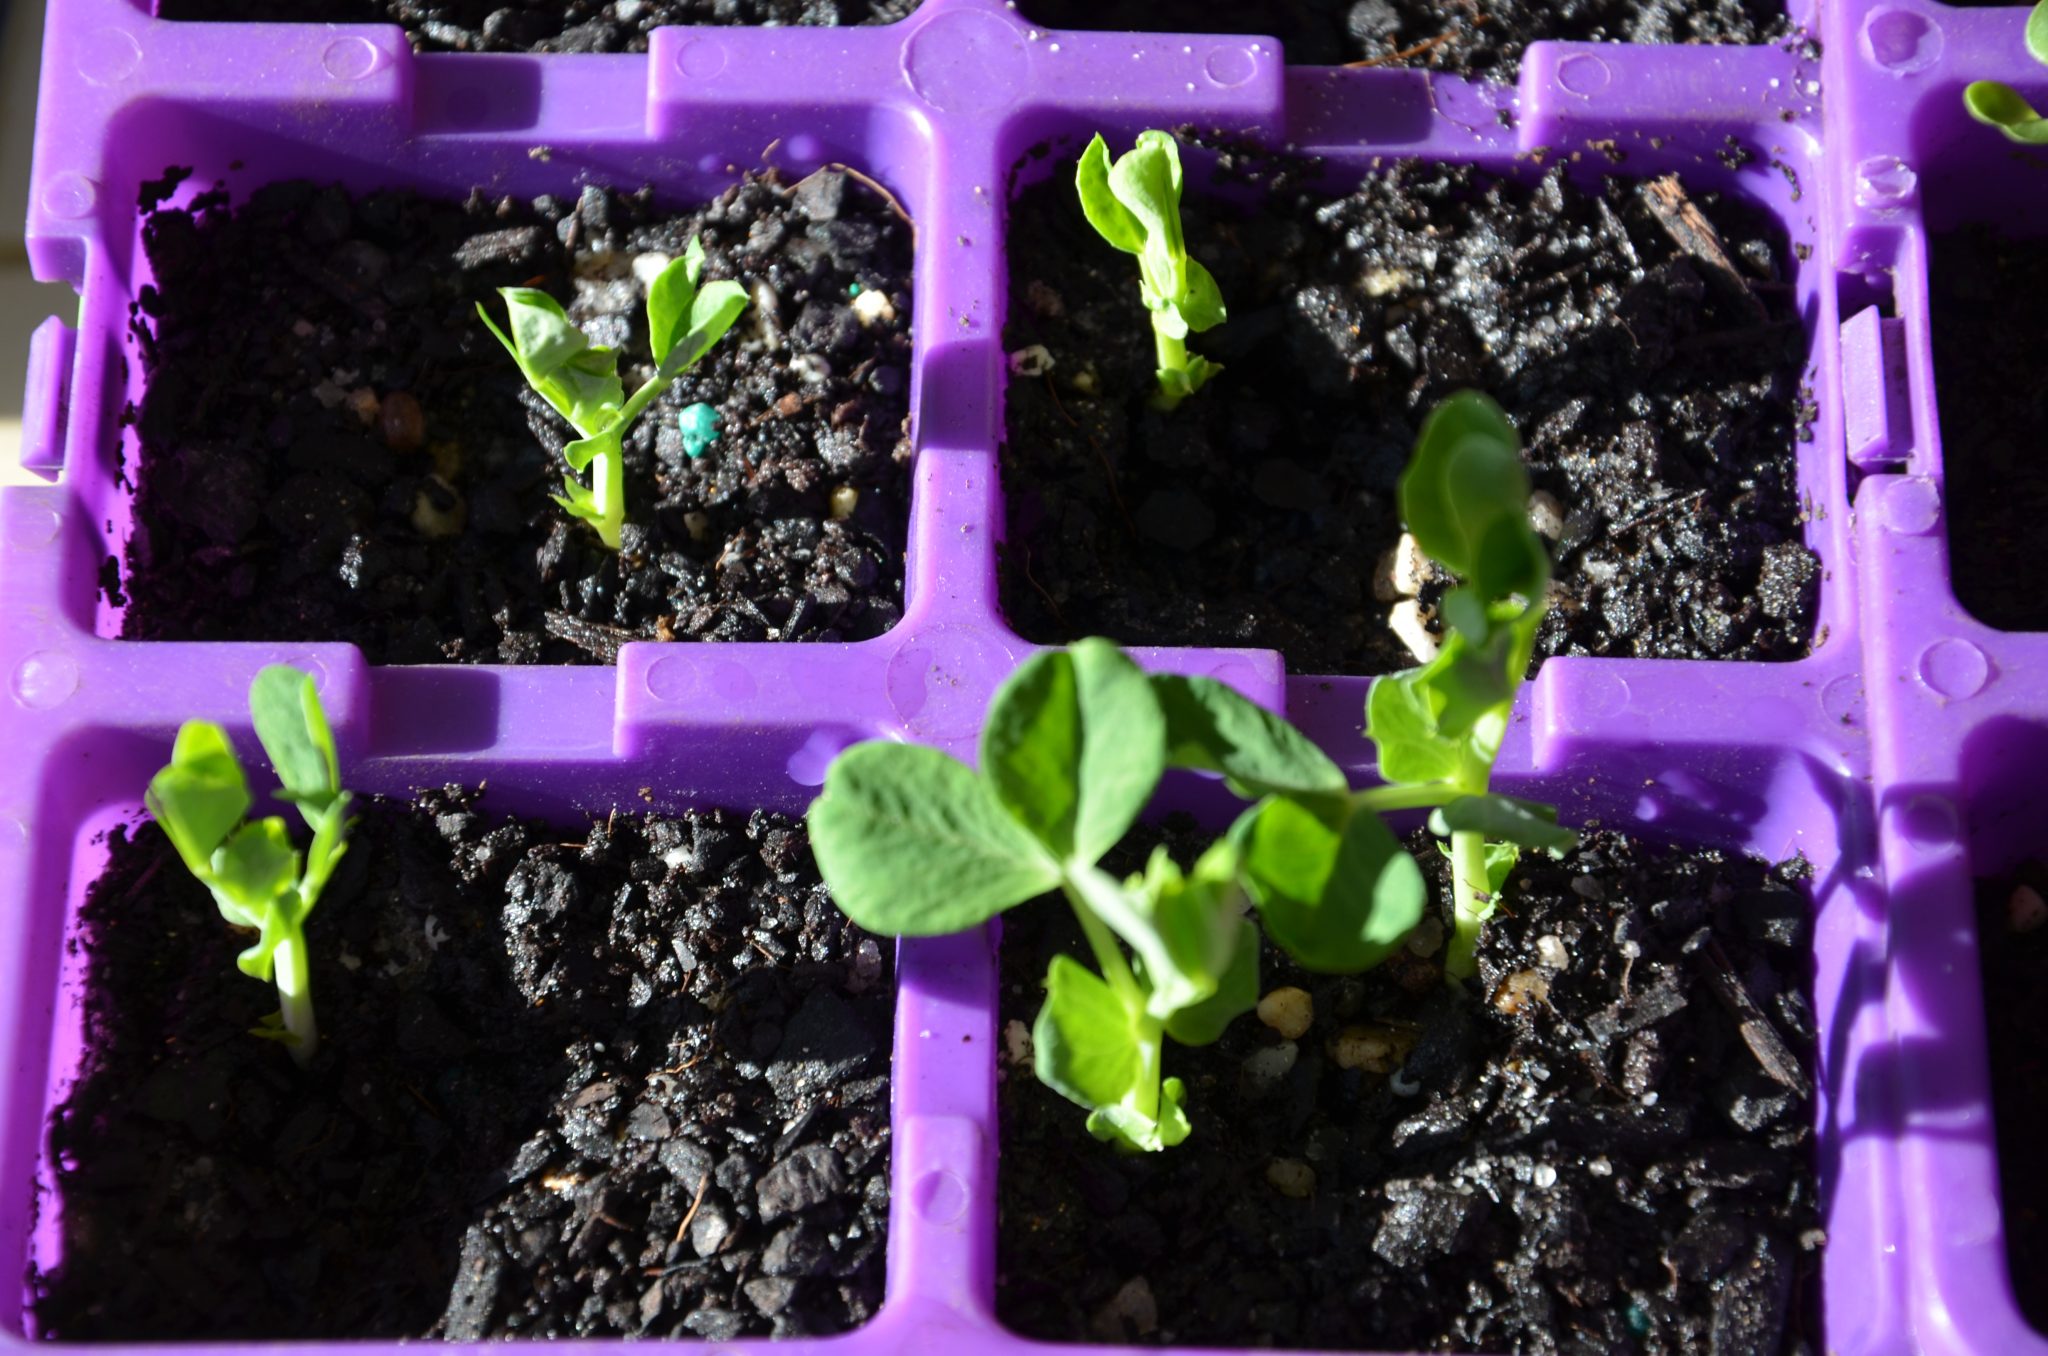
Perennial vegetables are a great way to supplement your annual vegetable production with very little effort. You plant them once, then get a harvest year after year with very little maintenance.


They are generally more drought tolerant and need less care than annual vegetables as they have large, well developed root systems which enables the plant to absorb water and nutrients from a greater area and depth of soil.


Here is a selection of perennial vegetables that are suitable for a temperate to cold climate.


Asparagus. Asparagus officinale

Because asparagus is a long-term crop, good initial soil preparation is important. Once established plants will continue to produce for many decades. The crowns should be planted in autumn in deep, friable, fertile well-drained soil in full sun. Dig a hole or trench a good 30 to 40 cm deep incorporate will rotted manure and compost. Asparagus does not like acidic soils so incorporate a little lime at the same time if you have an acidic soil. Plant crowns and water well with a seaweed based liquid fertiliser. Mulch.  Allow plants to grow without harvesting for at least three years after initial planting. This produces a large healthy crown that will provide good think spears for many years.

Manage your Asparagus patch by cutting back the clumps in winter and apply an annual application of aged chook manure mixed with a little wood ash or lime, mulch heavily with Lucerne hay, provided the hay is weed free this will eliminate any weed potential for the following year and slowly feed you plants at the same time. Pick spears whilst young and succulent until they become thin then let them go into leaf which will then allow all energy to go back into the crown for next years crop. Several applications of a seaweed-based fertiliser in early spring when spears are emerging will extend your harvest.

It is a good idea to thin out the female plants (those with red berries) and encouraging the males, as they put more energy into the crown rather then into berry production giving better harvest.

For more on asparagus

How to Grow Asparagus

Harvesting and using your Asparagus crop

Growing asparagus from seed- A cheaper alternative to buying expensive semi mature crowns.


Choko. Sechium edule

This perennial vegetable is related to melons and zucchini but is best grown over a fence or substantial trellis rather than on the ground. Chokos need a well-drained position with added compost and added animal manure ad some kind of structure to climb over. Obtain a whole fruit and place it in a warm light situation until it shoots. Half bury in a well cultivated planting hole and water well. Water and feed regularly and pick and eat the fruit while it is young and tender.

French Sorrel, Rumex scutantus

Sorrel is a slightly lemon flavoured green perennial herb used as a delightful tangy salad green and is also known as Buckler sorrel. It grows as a clump reaching 30-40cm with leaves 4-6cm across. It is a very hardy plant that will continue to flourish when the rest of your fresh garden greens are suffering either from the heat or the cold. Sorrel is best located in the full sun or with some afternoon shade and loves rich well-drained soil that is kept moist.

For more on growing and using sorrel see:

Growing and using Sorrel.

Ginger. Zingiber officinale

Ginger is a perennial herb native to Asia that grows 1 metre tall with underground rhizomes. It is native to monsoon forests and requires a well-drained soil, frost-free climate, and 1500 mm of rain annually or supplementary irrigation. It thrives best on loamy soils and likes the addition of well-rotted manure or compost. It does not like waterlogging. It does best in light shade, and it is a useful understorey plant in a “Layered food producing system”.

Obtain a good thick healthy looking rhizome place in a warm light situation until buds start to swell. Plant out in spring when the soil has warmed up and feed and water regularly. Rhizomes can be harvested at any stage once they have developed by digging down to the rhizomes and breaking off required amounts or the whole rhizomes can be lifted in autumn when the plant begins to go dormant. Save some rhizomes to plant next spring


Globe artichokes. Cynara scolymus

The leaves of globe artichokes are extremely handsome, with a lovely silver-grey appearance. They are in the thistle family and are a beautiful plant for the ornamental or vegetable garden. They are at their best in winter when the rest of the garden can be a bit drab.

They prefer a well-drained soil. Incorporate lots of well-aged low nutrient manure such as sheep or cow manure, add at little potash to encourage more flower bud production. It is the flower bud that you eat. Find a good recipe for preparing the buds it can be a bit fiddly but well worth it.

For more on growing globe artichokes see:

Growing Globe Artichokes

Jerusalem artichoke. Helianthus tuberosus

A Jerusalem artichoke is a white-fleshed root vegetable that is related to the sunflower. The plant is upright, tall-growing with bristly woody stems, green pointed leaves, and golden-yellow flowers like a small sunflower.

The edible tubers are elongated, knobby, white, red or purple skinned. Several tubers are clustered at the base of each stem. The tubers can be eaten raw or cooked and the flavour improves if they are left in the ground until frosted.

Best planted in the spring or early summer for good tuber production. Appreciates well drained and friable soils. A word of warning Jerusalem artichokes have the potential to be a bit weedy so make sure you dig up all the tubers as they will grow from the smallest most insignificant tuber and are compete against anything else planted near them.


Rhubarb. Rheum rhaponticum is a hardy and long-lived plant that will grow in almost any soil, but will thrive if it is grown in deep, well-drained soil. Poorly drained soil will kill the plant. The leaves are very toxic and should not be eaten or even fed to chickens, but composted. The stalks should be pulled away from the crown, rather than cut, make sure there is no remaining stem to rot the crown.
Feed your plants heavily with an annual application of well rooted chicken manure and good quality mulch such as Lucerne hay. Will benefit from watering in dry conditions. Flowering indicates that the plant is stressed so if this occurs remove flowers and increase watering and high nitrogen fertilising.

For more on growing rhubarbs see:

The Joys of organic Rhubarb

Dividing your Rhubarb Plants


Seven Year or Scarlet runner beans. Phaseolus coccineus

This perennial bean is an excellent nitrogen fixer for the soil. They will die back in winter but shoot again in spring. The plants can last up to seven years in the ground depending on the growing conditions. The beans should be picked when they are young and tender. This is great addition to a “Layered food producing system” as it will add nitrogen to the system, utilise vertical space and produce food.


Taro. Colocasia esculenta
Taro is a staple crop of the Pacific Islands. The tuber is a substitute for potato and can be used in a similar way, baked, boiled, or made into chips. Its very ornamental heart-shaped leaves can be used in the same away as spinach, but it needs to be cooked well to remove the oxalic acid.
The plant prefers moist, deep soil and it grows well in both full shade and full sun.

Be aware that Taro looks quite a lot like the Elephants Ear which is a common ornamental plant but is NOT edible.

Tamarillo Solanum betaceum

Tree Tomato is a fast-growing small tree that bears heavy crops of red or yellow succulent fruit. The fruit can be eaten fresh, or cooked or made into preserves.
Tamarillo’s are very quick growing and will crop in twelve months, reaching a height of 2-3 meters. They require well drained soil and protection from wind and frost.

Plant in early spring and feed and water regularly. Tamarillos are a short-lived perennial and will only crop well for 4 to 5 years. Semi hardwood cuttings can be taken in late spring to increase plant numbers or to replace older plants.


Warrigal Greens or Warrigal Spinach. Tetragonia tetragonioides

This is an Australian plant that also grows in New Zealand and in the coastal areas of Southeast Asia. It will continue growing for about two years, self-seeding on well-drained sites. It has a slightly bitter taste but is excellent in soups and salads.

Welsh Onions. Allium fistulosum

This is a non-bulb forming spring onion that multiplies by offsets near the base of the roots. It produces numerous bulbs, which cluster on a short rhizome. They will all self-seed in the garden. They are an extremely tough pant that needs very little care and has very few problems with pest and disease. Allow to establish for twelve months before using off shoots or trying to multiply your number.

Source link

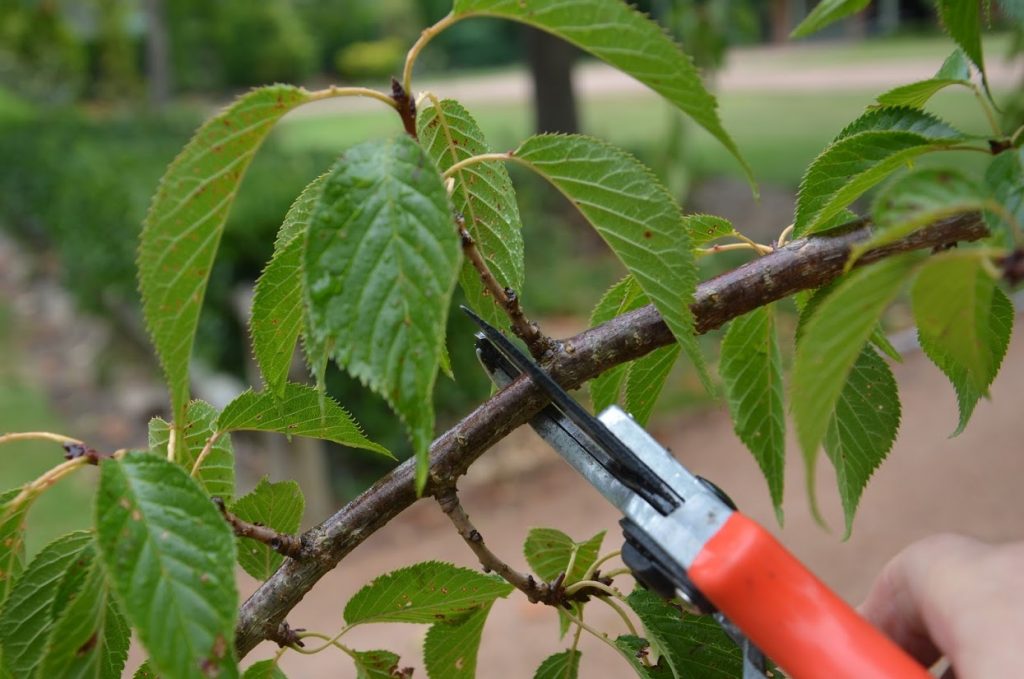
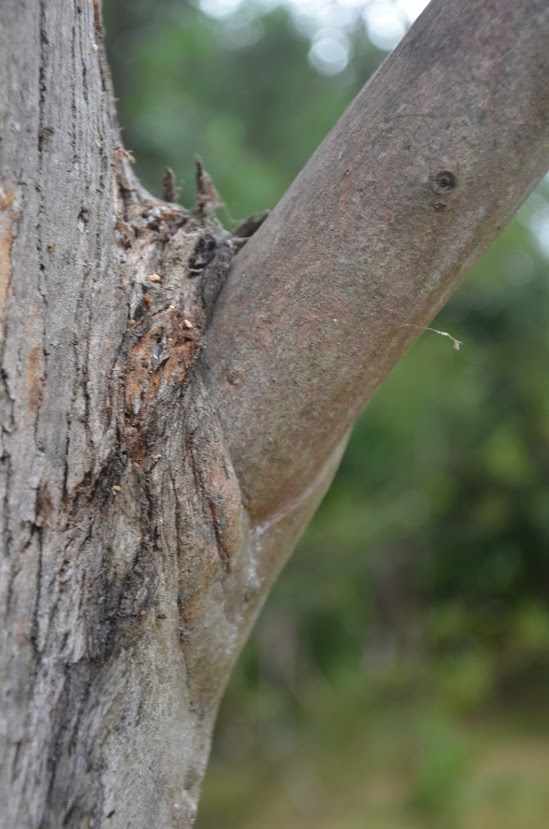
Here is a quick overview of the basic pruning requirements for the most common cool climate fruit trees.

You can read my other posts on Pruning Fruiting Trees and Pruning: Equipment Needed here.


It is always a good idea to have someone show you how to prune and point out what is fruiting wood/buds and what are vegetative buds. If this is not possible check out some of the video links at the end of this blog.

Almond. Fruit on semi-permanent spurs or sprigs. Best pruned during summer. Prune for general health and to manage size. The removal of one structural branch per year will ensure continued tree vigour.

Apricots. Fruit on one-year-old wood and semi-permanent sprigs. Best pruned after harvest or early autumn to reduce incidence of bacterial canker. Prune to promote new growth.

Apples and pears. Fruit on non-vigorous laterals, spurs and lateral tips that are at least two years old and growing horizontally. All varieties bear the best fruit on two-year and older wood. Best pruned in summer for maintenance, to encourage spur production or thin out older non-productive spurs.

Winter prune if the tree needs to rejuvenate, which will produce vigorous upright lateral which can be pruned the following summer to promote spur production. Where necessary remove weakened laterals to encourage more vigorous ones to develop spurs. Avoid tip-pruning young fruiting laterals as this promotes overcrowding which spoils the vase shape.

Cherries. Fruit on one-year-old wood and spur. Once established require little pruning so pruning should be for health maintenance of height and structural framework.

Peaches and nectarines. Fruit on one-year-old wood. Can be pruned in either late summer after harvest or in winter. They require heavy annual pruning. Prune back hard to a fruiting buds, keeping fruiting wood close to main framework to reduce branch bending and breakage when heavy with fruit. Prune to promote new lateral growth from main branches.


Plums: European.  Fruit on one-year-old wood, older wood and spurs, with the heaviest production on 2-year-old wood.  Can be pruned in either late summer after harvest or in winter. Plums tend to flower profusely leading to heavy cropping which can lead to branch breakage. Need to prune back to keep fruit close to main framework. Best to reduce all new shoot back by two thirds.

Japanese plums. Fruit on one-year-old wood Can be pruned in either late summer after harvest or in winter and need to have their new growth reduced by at least a half each year.

Citrus. Only require pruning for maintenance of health, height and shape. Best pruned in autumn.

Kiwi fruit. Fruit on growth arising from buds at the base (last six buds) of previous season growth. Best pruned in winter. Cut back all previous seasons long canes to leave six buds.

Figs. Figs normally bear two crops a year. The early, light crop is borne on the previous year’s wood; the main crop is borne on the current season’s wood. To avoid decreasing fruit production, restrict pruning to lightly thinning excessive growth. Tip-prune selected old leaders to promote fruiting wood. Spreading trees may require occasional attention to maintain a compact framework. Prune large branches back to shooting wood after the March harvest. Avoid cutting into barren wood with no leaf shoots.

Mulberries.​Mulberries do not normally require pruning. If necessary, prune in winter. Remove occasional old, overcrowded, thick laterals.

Here are some useful resources and videos that will help you become a confident fruit tree pruner.

https://www.flemings.com.au/wp-content/uploads/2015/07/pruning_multi_page.pdf

https://www.dpi.nsw.gov.au/agriculture/horticulture/citrus/content/crop-management/orchard-management-factsheets/pruning-videos

https://www.abc.net.au/local/videos/2009/09/09/2680701.htm

https://www.abc.net.au/local/videos/2009/09/08/2680016.htm?site=local

https://www.abc.net.au/local/videos/2009/06/23/2606206.htm?site=local

https://www.abc.net.au/local/videos/2011/08/02/3283626.htm?site=local


Source link

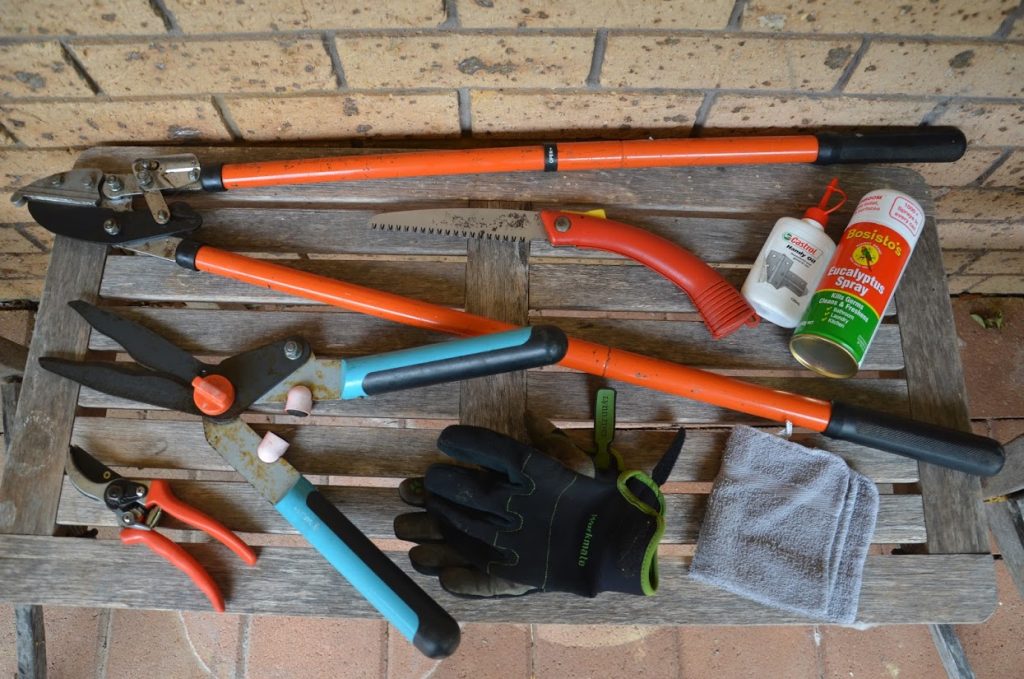
For successful pruning to occur it is important to use the right equipment.

Using the right equipment for the pruning task you have will mean that the task will be easier for you and the wounds inflicted on the plant will heal quickly maintaining the health of your plants

Most gardeners can manage with just a few basic pruning tools.


You can read my other posts on Pruning Fruiting Trees and Pruning cool climate fruit trees here.


Choose your tools carefully. Remember, cheap tools can be expensive as they break easily and need replacing often, whereas good quality tools, if looked after, can last a lifetime!

Bypass secateurs are the most used tool in the garden. “Bypass” means that the blades slide past each other in a scissor cut as opposed to anvil secateurs that pinches a branch between a blade and a metal block edge.

Bypass secateurs make a cleaner cut and are easier to use for most small pruning jobs. A cleaner cut will cause less damage to the plant tissue and the wound will heal faster.

Secateurs can cut branches up to 1 to 2 cm in diameter.

Image sourced from Pinterest

Long handled Loppers are used for branches that are too large for secateurs. Loppers work the same way as hand pruners, but the long handles give you leverage and therefore more cutting power to cleanly cut through branches up to 5cm in diameter, depending on the plant and the condition of the wood. They can also be found in a bypass or anvil design.

A pruning saw is an essential tool for making cuts on branches larger than 5 cm. Pruning saws can be made with a folding or a fixed blade. Many are designed with a curved blade to cut on the backward or pull stroke instead of the push stoke. This makes cutting awkward overhead branches much easier. In general, saws with large teeth (2-3 per cm) are good for cutting larger green branches. Saws with a slimmer blade and smaller teeth (up to 5 per cm) are better for dead wood and smaller branches. Do not try to use a carpenter’s saw for pruning because the green wood will quickly clog the saw and dull the blade!

Pole Pruner. Pruning saws can also come as an extendable pole pruner with just a pruning saw blade or with an attached secateur blades, operated by a rope system. I prefer a pole pruner with just a pruning saw blade. These are great for branches that are out of reach as they save you having to use a ladder. They also give you a longer reach into the middle of a tree that may be difficult to get to because of the branch structure.

Be careful of branches falling from any height, they are always bigger and heavy then they look from the ground.

An electric or petrol pole saw or small chainsaw might be practical if you have an extensive orchard with large trees.

It is always good to wear eye protection when pruning to prevent saw dust getting into your eyes and deflect any branches.

Wearing a sturdy pair of gloves can prevent scratches to your hands.

Equipment Maintenance.

Always disinfect your pruning tools (with diluted bleach or with eucalyptus oil) between plants to avoid spreading disease to healthy plants.

Keep tools sharp, clean, and oiled for best results. Have a look at these videos if you are not confident at tool maintenance, especially sharpening.

https://felco.com/en_za/services/maintenancePrevent rust by oiling your tools frequently.

A ladder can also be helpful, but make sure it is on stable, level ground and do not overextend your reach.

There are many other tools out there that are variations on these basic themes. If any of them makes your work easier and faster, it is probably a wise investment.


For information on when and how to prune and specific needs of different varieties see my blog at:

Pruning Fruiting Trees

Pruning cool climate fruit trees.


Pruning is the process of removing parts of a plant for health reasons or to encourage certain types of growth.

Not all food bearing plants require pruning, whereas some species benefit greatly if pruned correctly and pruning requirements are often specific to the species.

The need to do any sort of pruning should be well considered, before the commencement of pruning, as all wounds have the potential to leave a plant susceptible to pest and disease infestation. There has to be a net benefit in doing the pruning, either for the plant or for you as the harvester.

It is important to understand the pruning requirements of each of your fruiting plants.


You can read my other posts on Pruning: Equipment Needed and Pruning cool climate fruit trees here.


Basic terminology

Branch collar—A raised area of tissue at the base of every branch. It contains specialized cells that seal off pruning wounds to protect the plant from disease. Always prune to, but not into, the branch collar.

Bud- an undeveloped or embryonic shoot and normally occurs in the axil of a leaf or at the tip of a stem. Can be a fruiting bud (flower) or leaf bud.

On stone fruit the fruiting (flower beds) sit either side of a leaf bud

Bud or graft union-The union of the rootstock and scion variety.

graft union on established tree

Crotch angle—The angle formed between the trunk and a limb. The strongest crotch angle is 45 to 60 degrees.

Crown—The base of the trunk where the tree meets the soil.

Fruit spur- a single or multiple set of compact branches bearing fruiting and vegetative buds.

On stone fruit the fruiting (flower beds) sit either side of a leaf bud

Heading (or head cut)—A pruning cut that removes only part of a branch.

Included bark- “ingrown” bark tissues which can develop where two or more stems grow closely together causing weak, under-supported branch angles or crotches.

Lateral branch—A side shoot off another branch, usually at a more horizontal angle.

Leader—The uppermost portion of a scaffold limb. In a central-leader trained tree, only one leader is left in the centre of the tree. Multiple-leader trained trees usually have three to five leaders per tree.

Scaffold limb—A large limb that forms a tree’s framework.

Shoot—The length of branch growth in one season. The bud scale scars (ring of small ridges) on a branch mark the start of a season’s growth.

Spur—A short shoot that fruits.

fruiting spur on apple tree

Stub—A short portion of a branch left after a pruning cut. Avoid leaving stubs when pruning as they die and can leave the plant susceptible to disease.

Sucker—A lateral growth that is growing from below the bud or graft union or from the roots.

Rootstock- The plant on which the selected variety of fruit has been budded or grafted on to.

Terminal—The end of any shoot.

terminal bud

Thinning cut—A pruning cut that removes an entire branch from its point of origin.

Trunk- The main or supporting butt of the tree.

Vertical branch—A branch that grows upright.

Water sprout—A lateral shoot that grows very vigorously within the tree often growing very vertically and arising from a dormant bud.

Ver verticl vigorous shoots on trees are called water shoots

Basic fruit tree structures

Imaged sourced from Pinterest


Reasons for pruning.

For plant health.

Frequent removal of older stems encourages a plant to put energy into new growth, thus keeping the plant vigorous, healthy and often increasing the availability of fruit-bearing wood.

Removing dead or damaged branches and branches that are rubbing together. This will decrease the chance of disease entering through the dead or damaged wood and spreading throughout the plant.

Diseased wood or foliage should also be removed to prevent spread to healthy sections of the plant

Formative or structural pruning.
This is pruning that is carried out on young plants that encourages a strong framework of branches that:

  • Reduces the incidence of included bark, which can weaken a crotch and make it prone to wind damage.
  • To help support the weight of developing crops, which are particularly vulnerable to breakage during  windy conditions.

To limit plant height and width.
This may be done for several reasons:

  • For ease of netting, maintenance, and picking.
  • To enable the plant to fit into a limited space

To control the direction of growth or shape.
Again, so it will fit into a particular space or to create a particular type of plant structure such as espalier.

To improve air circulation.
This is usually achieved by removing some branches, particularly those in the centre of a plant, to help increase airflow through a plant to decrease the chance of fungal diseases, such as brown rot in peaches.

Increase light penetration
Again, the removal of branches from the centre of a plant to increase the amount of light reaching all foliage and fruit which will ultimately improve fruit ripening and colour.

Increase the amount of fruit-bearing wood.
In Pome fruits (apples and pears) which produces fruit on spurs or two-year-old wood, by cutting back young vegetative growth in summer you will encourage the plants to put energy into spurs or fruit-bearing wood. Whereas in stone fruits, which bear fruit on last years new growth, then pruning during winter or after harvest encourages new growth during the growing season which will produce fruit the following year.

Decrease the amount of fruit-bearing wood.
Too much fruit will cause fruit to be small and can cause damage to trees through limb breakage from excess weight as the fruit matures. Removal of some fruit-bearing wood will protect the tree and improve fruit size and quality.

Removal of water sprouts
Water sprouts are vigorously growing upright shoots arising from above the graft union on grafted trees. In some cases, water sprouts can be trained to form strong branches and can be beneficial. However, if they are creating crowding, have narrow crotch angles, are crossing or rubbing, or are causing poor branch or tree structure, they should be removed.

Removal of suckers
Most deciduous fruit trees are grafted on to seedlings of an undesired variety. All growth arising from below the graft union or from the root system should be removed. If not, the rootstock, which is much more vigorous, will become establishing and dominant eventually killing the desired, grafted variety.


Knowledge required before attempting pruning.

  • Basic knowledge of plant anatomy and physiology. Information can be found in these publications http://www.myproductivebackyard.com.au/product/plants-module-1/ http://www.myproductivebackyard.com.au/product/plants-module-2/
  • What pruning tools are required and how to use and maintain. See my blog at: them.http://www.myproductivebackyard.com.au/?p=2915&preview=true
  • How to prune to ensure effective and quick wound healing.
  • The type and age of the wood that produces fruit for the species you are pruning.
  • Being able to tell the difference between a leaf bud and a flower bud.

When to prune

Structural pruning should occur when the plant is young. The smaller the branch, the smaller the wound and the less energy required to heal it.

Structural pruning ensures that a strong framework of branches is produced on a tree that enables it to carry crop loads and prevents damage to trees. Aim for four or five main limbs, with secondary limbs arising from these.


The most common shapes are vase (stone fruits) or pyramidal (pome fruits). In my experience, using a vase shape for all fruit trees enables you to maintain a plant’s height and openness.


Image sourced from Pinterest

Major structural or rejuvenation pruning of mature trees should occur when the plant is actively growing, but beware of the risk of sunburn damage. Complete on an overcast day and when excessive heat is not forecast for several days.

Traditionally, pruning usually occurred whilst deciduous trees were dormant.

The reasons for this were:

  • Limited sap flow so no “bleeding”, however the wound will be slow to heal.
  • The framework of the plant is very visible and easy to determine what branches need to be removed.
  • In winter there is generally less work to be done in the productive backyard/orchard, giving horticulturalists the time to complete any pruning tasks.

However, it is becoming common practice to summer prune, as it is more beneficial to some species as it promotes faster healing of pruning cuts and reduces the incidence of fungal and bacterial infections.

  • In certain species, it can also encourage higher yields as it will promote reproductive wood rather than vigorous vegetative growth.
  • The extra light and airflow created by foliage removal is beneficial to ripening fruit.


Pruning times will vary with each fruit plant you have. See links below to other blogs for some basic information on specific  fruiting varieties. Otherwise do the research and find out when it is the best time to prune your specific plants for the results you want.


Pruning: How to Prune

Small Branches: Make a sharp, clean cut just beyond a lateral bud or outer branch.

Image sourced from Pinterest


Ensure your secateurs blade is against the part of the plant not being removed, this ensures a clean non crushed wound.


Image sourced from Pinterest


Large Limbs: When large branches need to be removed, it is important to use the three-cut method.

·       A. Make a partial cut from beneath.

·       B. Make a second cut from above, several inches along form cut A and allow the limb to fall.

·       C. Complete the job with a final cut just outside the branch collar.

Image sourced from Pinterest


Pruning Fruit trees – Step by step.

  • Always work with clean, sharp tools. Disinfect tools (with diluted bleach or Eucalyptus oil) between trees to avoid spreading disease.
  • Study the plant from all sides before you start pruning to estimate how much and what kind of wood needs to be removed.
  • Learn to make cuts correctly. Always prune just above an outward facing bud to encourage horizontal growth and prune above an inward facing bud to encourage vertical growth.
  • Begin by removing any suckers. (Growth emerging from below the graft union)
  • Remove any obviously dead, diseased or damaged wood.
  • Remove any branches that are crowding, or have the potential to crowd, the center of the plant (for vase structure), are causing overcrowding or cross over each other. Pay particular attention to branches that are rubbing, or have the potential to rub, up against each other as this causes wounds which are a potential site for disease to enter.
  • Remove lower branches that may reduce access to the tree or cause fruit to touch the ground.
  • Remove branches not part of the structural framework.
  • Stand back and reassess
  • Now prune to species requirements.

To ensure you are familiar with your fruiting plants pruning requirements consult a reputable source for specifics concerning when and how to prune a particular plant.

It is essential you know what type of wood will bear fruit.


Link to my blog on equipment needed for pruning:

Pruning: Equipment needed.

Link to my blog on  basic  pruning requirement for different species:

Pruning cool climate fruit trees.


Photo sourced from nurseriesonline


If you would like to try growing your own fruit such as peaches, apples, blackberries and raspberries now this is the time to get into nurseries and check out their bare-rooted stock.

Even in the smallest of backyards there is room for several fruit trees and some berries. Most fruit varieties can be purchased as a dwarf or mini versions that do not take up as much room as their full-sized counterparts and can be easily grown in pots if you are renting or have a balcony or courtyard.


A few things to think about before purchasing:

Soil.

Most fruiting plants need a fertile well drained soil. If this does not describe what you have in your backyard, think about raised beds.

For pots always buy the best quality potting mix you can afford and be prepared to water and fertilise regularly.

Sunlight.

Most fruiting trees will need at least 6 hours sunlight a day. However, there are some fruiting plants such as Blueberry, Raspberry, Cranberry, Strawberry, Hazelnut and Macadamia that will grow and produce in partial shade.

What type of fruit do you like to eat?

There is no point in growing fruit that you or your family will not eat.

I put in Kiwi fruit once- one male and one female- after about two years we were getting buckets of fruit but no one in the family really liked eating them so they were mainly given away. Waste of money, space, and time as they were very vigorous, and it was a lot of work pruning them back each year and then picking all the fruit. They are no longer part of my fruit production.

What will grow in your climate?

Do some research, ask your local nursery, talk to neighbour, walk around you neighbourhood and see what is growing well, visit your local community garden. These are all great ways of obtaining the knowledge required to firstly select and then maintain your fruit producing plants.

Don’t forget to ask if the varieties you are looking at need a specific pollinator.

A little bit of local knowledge can prevent the heart ache of seeing plants die or not perform well and can save you a lot of money and energy needed to purchase and maintain unsuitable plants.


From here make a list which will be made up of the fruit your family like to eat and what grows well in your local climate.

Consider some of these ideas when choosing fruit trees for your backyard

  • Plant deciduous trees on your northern boundary for winter sun and summer shade
  • Plant a north facing layered food forest system
  • Plant varieties grown of dwarf root stock ie citrus grown on trifoliate root stock will always be about 2/3 of their normal size
  • Dwarf or Miniature fruit trees such as nectazee and Pixzee peach only get to about 1.5 meter tall. You can also get dwarf citrus, mango, and avocado
  • Columnar apples such as ballerina are a great narrow growing variety ideal for along fence lines
  • Multi-grafted trees with several varieties of apple or peach on one plant great where a different pollinator is needed
  • Espalier against fences or walls great for citrus and pome fruits. Stone fruits are a bit too vigorous for this method of production
  • Hedge citrus or avocado for a privacy screen or wind break. Hedging is a great way to ensure the amount of sunlight you get into your backyard is not diminished.
  • Growing in containers
    • Many varieties of fruiting plants are extremely attractive and can become a feature in your yard or paved area.
    • Container growing will allow you to grow plants that may require moving to get more sun or be protected from frosts.
  • Most fruit bearing trees can be containerised particularly if they are dwarf varieties or grown on dwarf root stock.

Here are some of my favourites fruiting plants for pots –citrus (smaller varieties like Finger lime, Myer lemon, Tahitian lime, Mandarin, and cumquats) dwarf peaches, nectarine and apples, olives, pomegranates, blueberries and strawberries.

  • Just remember the larger the container the better and make sure it has adequate drainage holes. Elevate the pot so it is not sitting on the soil or sand laid pavers. If it is the roots will grow out the drainage holes into the soil/sand beneath and eventually expand to block the drainage hole, eventually killing the plant. Use the best quality potting mix you can afford and be diligent about watering and fertilising on a regular basis and re-pot every 3 to 5 years

A hedge of apples

Buying your plants

Most fruit trees that can be purchased in nurseries and hardware outlets are grafted. Plants are grafted to obtain production of a particular variety, that would not grow true to type if grown from seed and usually cannot be grow from cuttings. It is also a means of getting plants that will produce earlier in their life and to produce plants that are resistant to pest and disease.

Grafting is a process of taking a shoot or bud (scion) of a selected plant variety and joining it to the stem of another living tree, which will then become the selected varieties root stock.

Grafted trees are more expensive than seedling, but you do get a known variety that allows you to purchase plants that are proven to do well in your area.

Purchasing your plants

Deciduous trees and cane berries are best purchased and planted out in winter when they are dormant. It is also more economical if they can be purchased Bare rooted, that is dug up and sold without soil or a pot to contain it.

Evergreen trees, such as citrus, are purchased potted or bagged in soil and are best planted out in autumn. This is when the soil is still warm so root growth will occur, but the cool air temperature prevents leaf growth allowing the plants to become established before spring and summer arrives.

Always choose healthy young plants with a good branch structure and no sign of pest and disease.

Ensure that you have selected your planting site and that all necessary soil improvement has occurred before purchasing. This allows plants to be planted out as soon as possible.

Always water newly planted trees in well as soon as planted.

Apply a 10cm layer of Mulch in a 30 cm circle around the base of the plants ensuring that is kept away from the stem.

Several applications of a seaweed-based tonic, such as seasol, will help the plant become established.

For more information:

Check out this video on how to plant bare rooted trees.

Bare Root Fruit Trees


Also check out my blog on Growing organic blueberries http://www.myproductivebackyard.com.au/how-to-grow-2/growing-organic-blueberries/

Next blog how to prune your backyard fruit tress


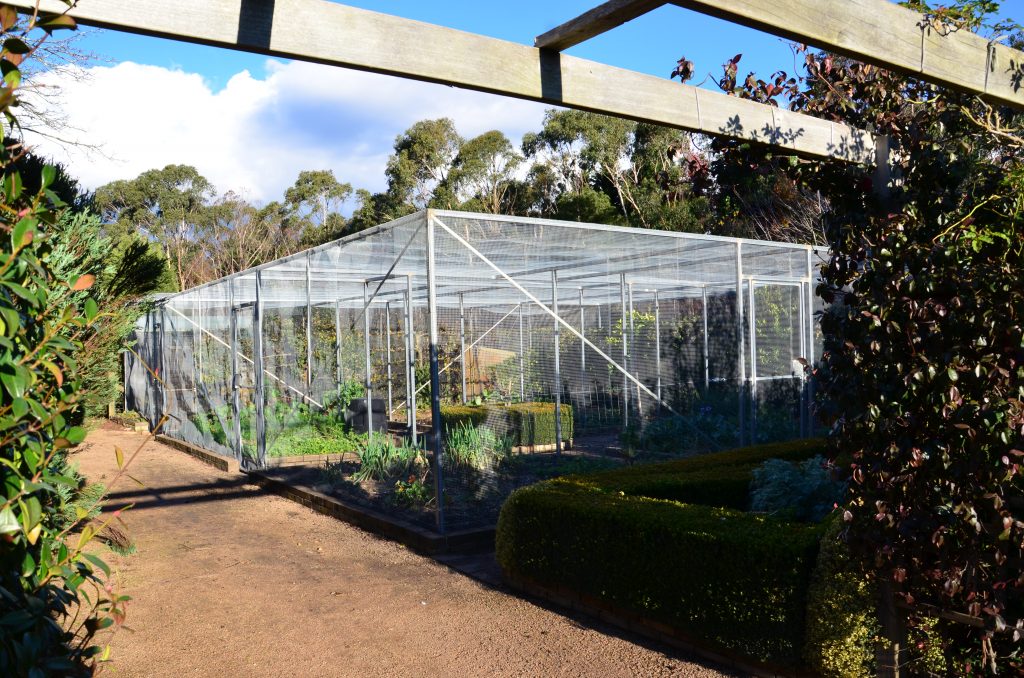
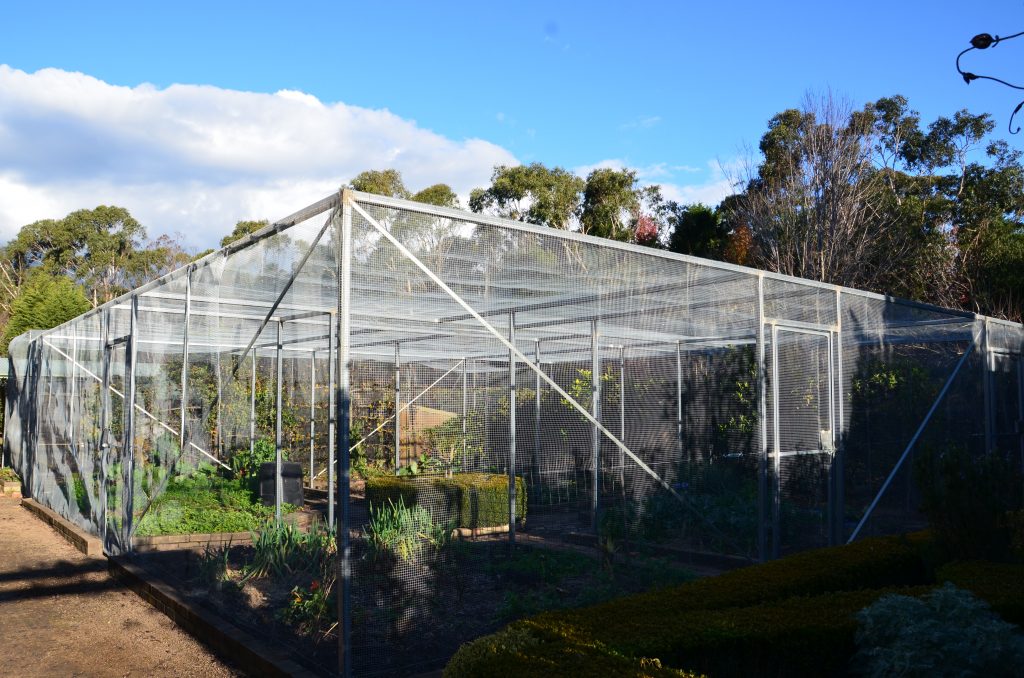
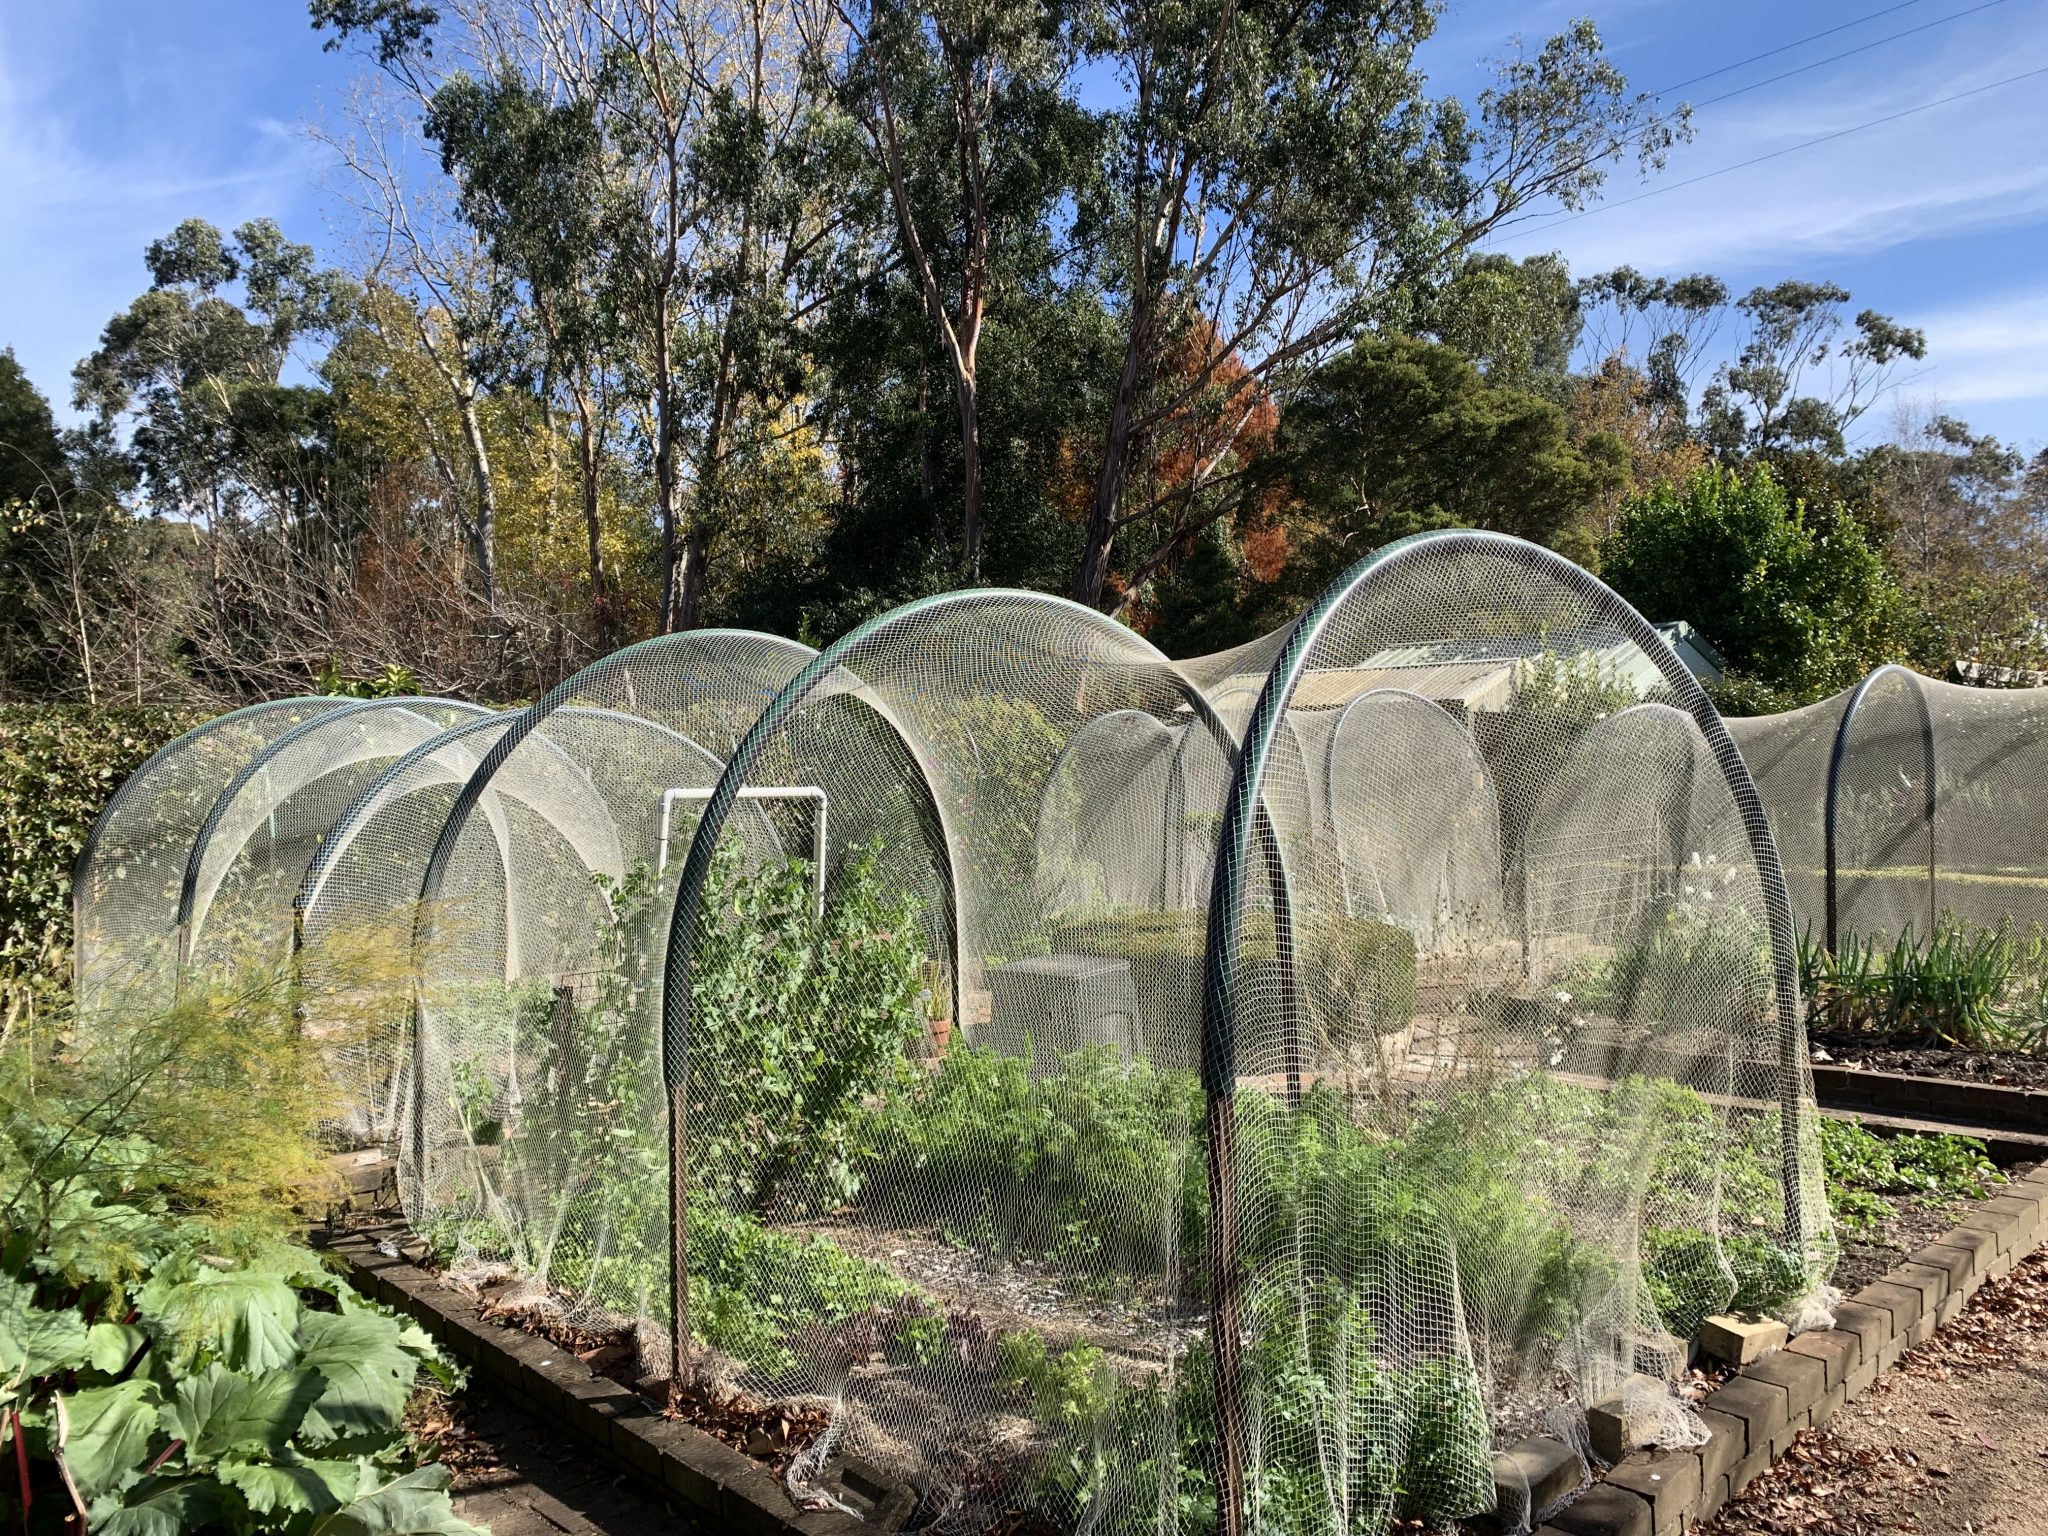
My vegetable garden enclosure

It has been nearly 12 months since I installed a steel and mesh enclosure over my vegetable garden.

My initial reaction was “wow how easy is it now to access and work in the space” but with time I have started to see the advantages of the structure for use in vertical production.

I had a very set space that I wished to cover as I had existing beds and mature planting. If you are just starting out and planning a vegetable garden that will be enclosed, then taking into account the amount of vertical space you can  utilise means that production per spare meter is greater and you can potentially reduce the size of the enclosed area, which will cost less.

On one side of the enclosure, I already had established espaliers on the chicken run fence so these were incorporated into the enclosure and have been every productive and a lot less effort than having to cover them with netting. Espalier is an easy, extremely productive way to grow certain fruit trees. It is great for pome fruit such as apples and pears, and I successfully grown citrus this way as well.

my espaliered apple trees cropping beautifully

On another side I had a bed of I had a row of fruit trees consisting of a lemon, an orange, a mandarin and 6 pillar apples. As these were up against a fence, they were difficult to net so I have had limited harvest off them over the years.

To reduce the height of the enclosure I cut these trees back down to 2 meters high and have now effectively hedged them. They do need to be pruned (height and width) several time during the growing season but have still produced great crops.

I have hedged the fruit trees on this side of the enclosure.

The espaliered apples and the hedge of citrus and apples are on the south east and south western sides of the enclose so there is no trouble with shading of any part of the garden.

The other two sides of the enclose have northern eastern and north western aspects so I did not want to grow anything up these sides to maintain maximum sun exposure, which is needed for most vegetables and fruit trees.

Next, I installed several trellis systems along the southern sides of the garden beds. These are separated from the fruit trees by a path. These trellises will support annual crops that naturally which produce tendrils and can self-attached such as climbing beans, climbing peas, vine tomatoes and the cucurbits: mainly cucumbers, but next year I will try pumpkins- the fruit  will need to be supported  as it matures but with the  trellis being of solid weld mesh this should not be a problem.

A piece of mesh attached to the enclosure frame supports snow peas

I also have some thorn less blackberries trained against one corner of the orchard enclosure. By tying then up the mesh and only to a height I can reach they are easy to pick.

A blackberry tucked into a corner of my enclosure

Whilst the enclosure keeps birds from eating my strawberries when I was growing them on the ground, the slugs and slaters were still attacking them. To overcome this, I installed six hanging baskets, installed drip irrigation to water them, filled with strawberries and I have been picking fruit all spring, summer, and autumn.

strawberries

Hanging systems can also be used for tomatoes (Cherry varieties) or upside-down lettuce or herb production.

Just remember they dry out very easily and need constant watering.

After previous experience of vines on chicken enclosures I have deliberately not planted vines such as grape or Kiwi fruit on my new enclosure. They are very rampant, have very persistent means of attaching themselves to the netting, making pruning and removal difficult. Without constant maintenance they will cover the entire enclosure very quickly, shading all  other plants that need full sun.

By taking advantage of the vertical spaces created by the enclosure you can increase your production greatly. Just remember to concentrate these vertical systems on the southern (southern hemisphere) sides of your enclosure to prevent shading of the rest of your garden.

Happy gardening

Kathy

I have used some of the central uprights as support for cut flowers such as this chrysanthemum.


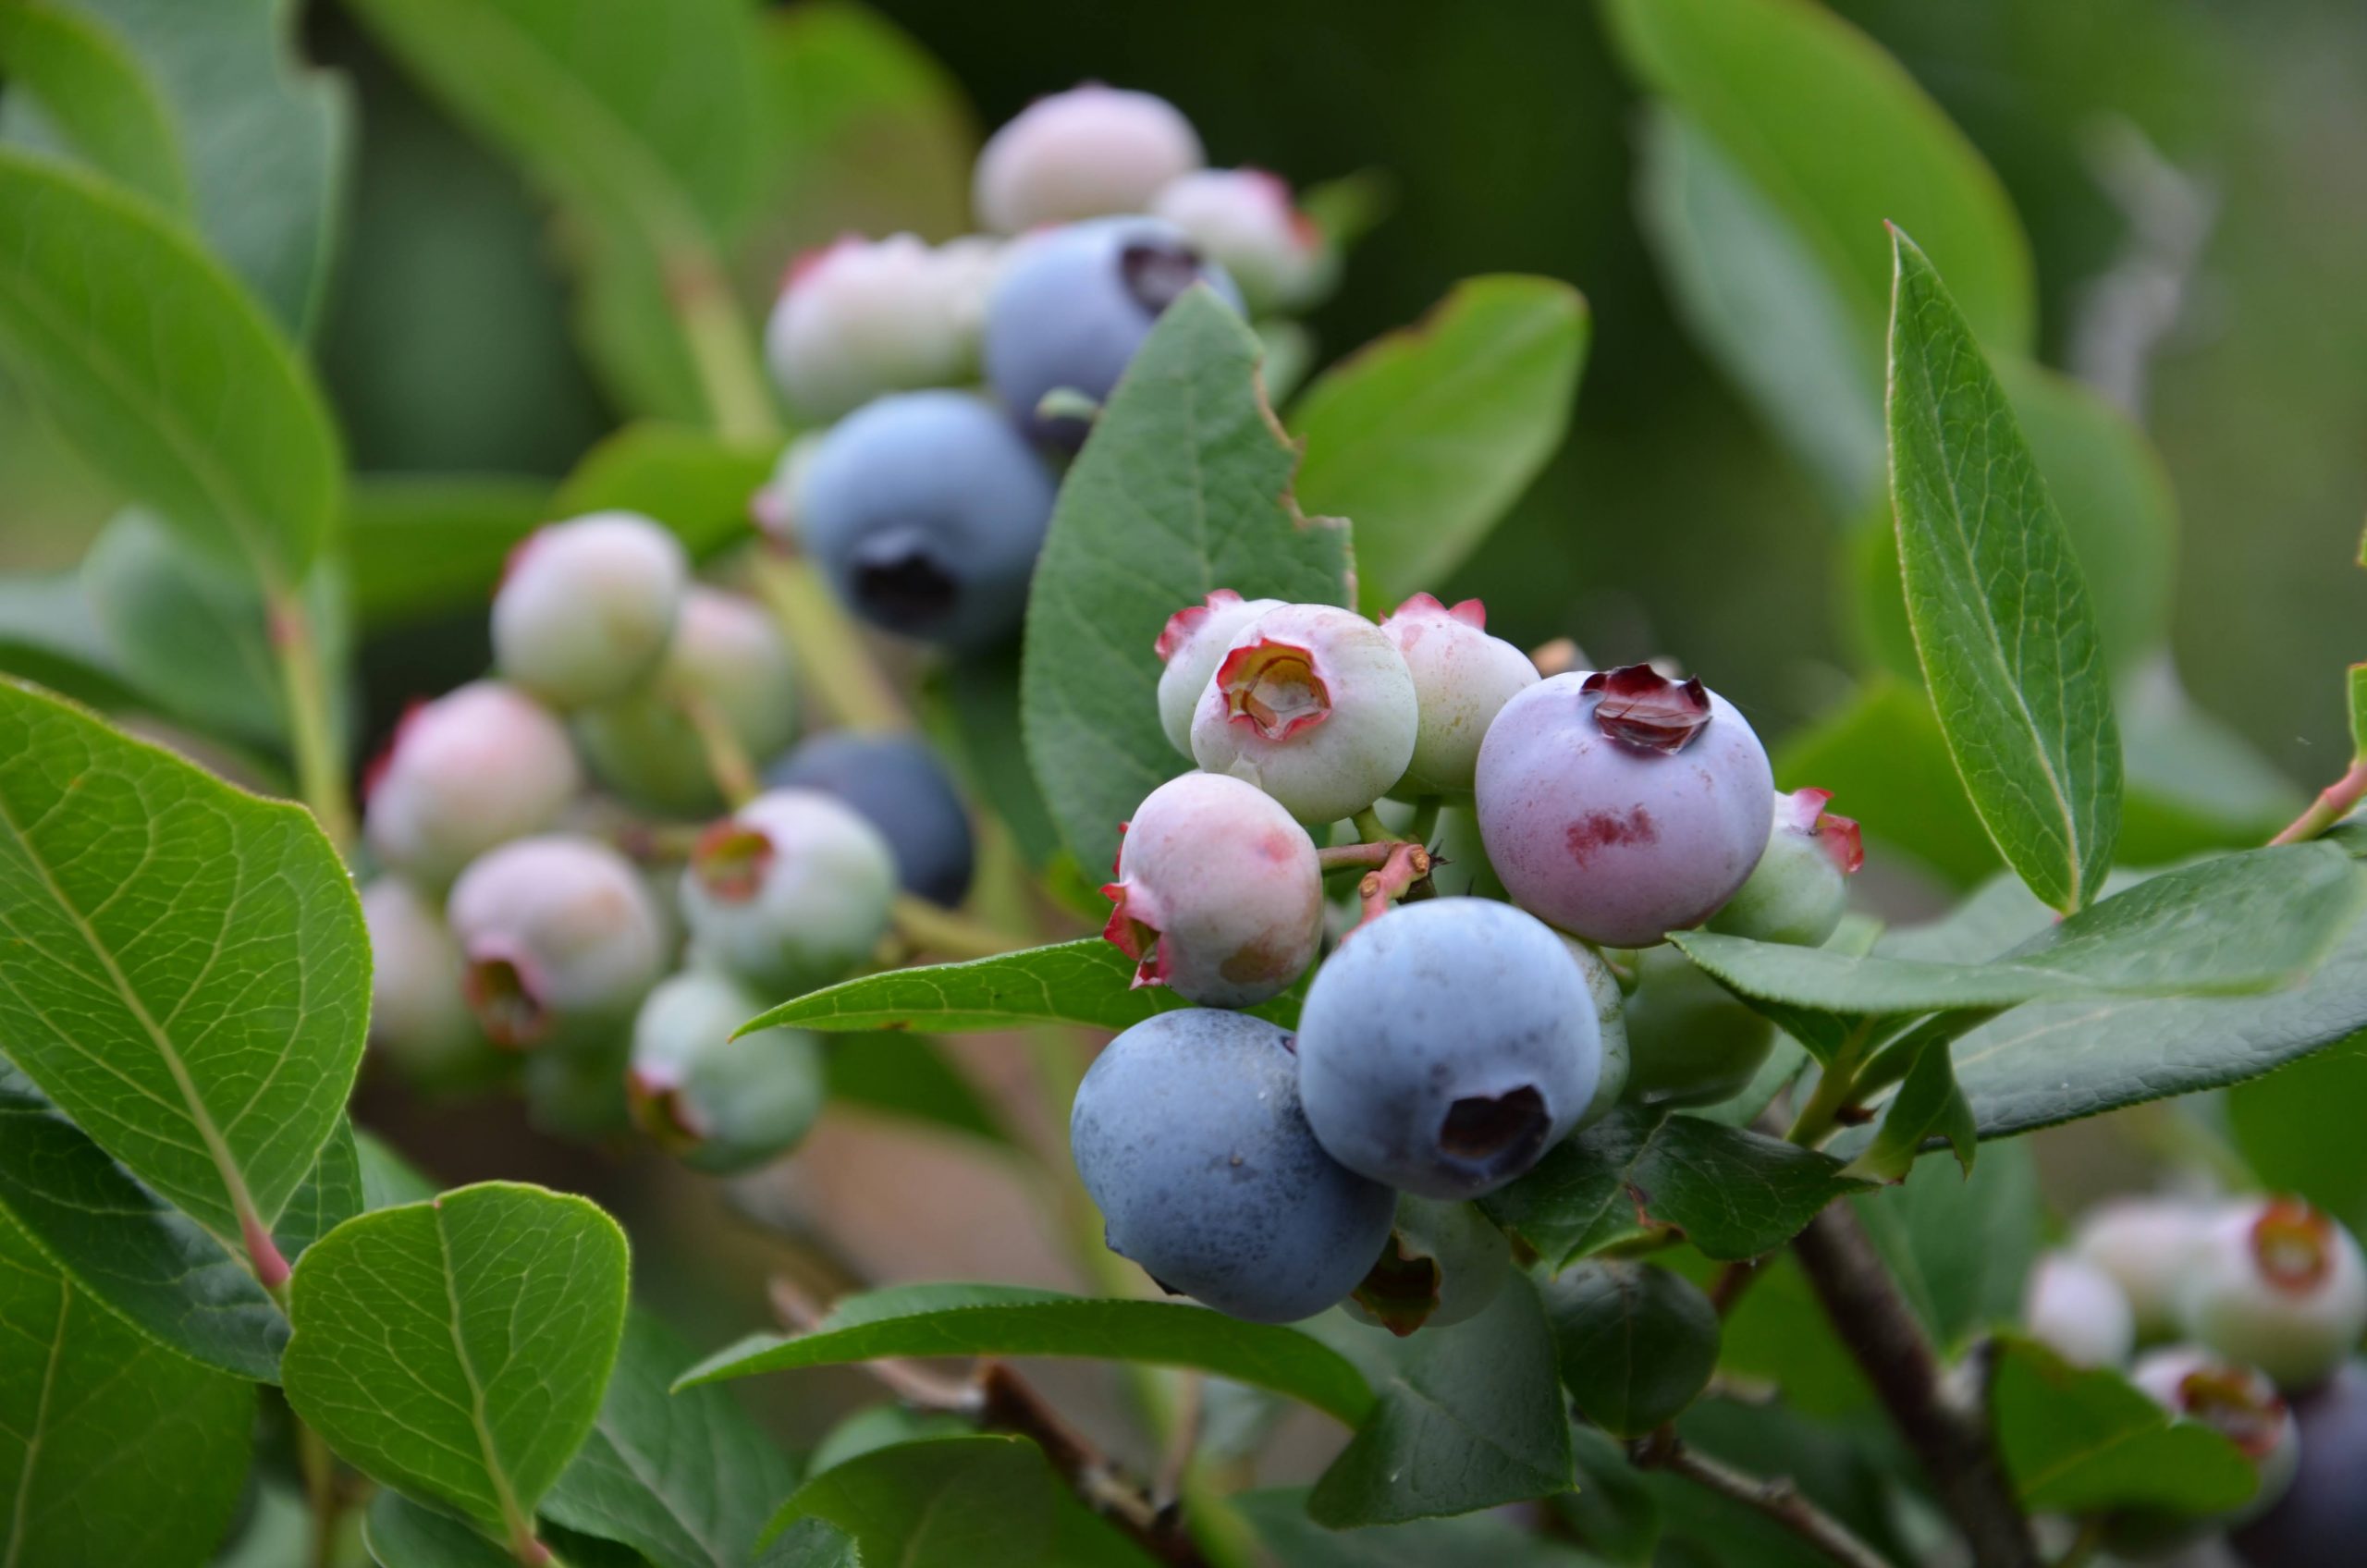
Home grown organic blueberries are just delightful. Compact  and super easy to grow, blueberries are a must for anyone interested in growing their own food.

Blueberries are a long-lived plant and whilst they are expensive to buy, they will give you a lifetime of fruit if planted in the right position and maintained well.

Whilst Blueberries do exceptionally well in cool climates there are plenty of varieties that will grow successfully in warmer situations. Talk to your local nursery staff and see what varieties they recommend for your local area.

They can either be grown in the ground or in pots.

 I have 14 Blue berry plants and have deliberately planted a range of varieties as this allows for better pollination and spreads my harvest over a longer period – usually from mid-December to mid-February.(Southern hemisphere). From these 14 plants I harvest enough fruit to have either fresh or frozen fruit all year.

Initial bed preparation is the key to success with Blueberries.

Blueberries need an acid soil that has lots of organic matter in it and is well drained.

Whilst I have an acid soil it does tend to get waterlogged in rainy periods, so I have planted my blueberries in a raised bed.

Even though my soil has quite a lot of organic matter in it naturally, I still improved the beds with lots of well-rotted cow and sheep manure. These two manures give lots of  organic matter without a lot of nutrients. This really increases the friability of the soil, which is perfect for blueberries.

My blueberry bed is in full sun and protected from strong winds by an evergreen hedge to the south west of my plants. Blue berries will grow quite well in dappled shade, but your harvest will be reduced.

How I maintain my plants.

In early spring, I fertilise my plants with a balanced fertiliser which contains poultry manure, rock phosphate, blood and bone, potash, warm castings rock minerals, fish meal and a seaweed extract. There are a number of commercially produced fertilisers with similar combinations of ingredients. The idea is to supply your plants with a wide variety of nutrients and soil conditioners at the beginning of the growing season. I scatter about 2 cups of fertiliser around the base of each plant and water it in well.

I then mulch with either pine needles or mixed wood chip to at least a depth of 10cm.This helps conserve moisture, keeps weeds under control as well as adding an annual boost of organic matter to the soil.

Blueberries have a shallow fibrous root system so are not drought tolerant. I have irrigation set up with 2 drippers on each plant and water weekly during the growing season and twice weekly during extra hot, dry and/or windy periods.

Once harvest is complete, I prune my plants by removing any dead wood, cutting back older canes (3 or more years old) to ground level and clearing out any weaker growth in the middle of the plant. This allows more sunlight into the middle of the plants giving better ripening of fruit and good air flow around the plants to help preventing mildew outbreaks.

Harvesting.

You will need some form of protection for your  plants to keep birds from eating the fruit.

Other than birds I have had few  pest and disease problems. The occasional die back of a branch and some powdery mildew in very wet humid conditions.

Up until this year I have used a netting system consisting of a simple frame made from poly pipe, gently bowed, and pushed over the top of steel posts. Over this I draped 10 m wide netting and weighted down with pavers. I used to leave the netting in place all year.

Though it was a cheap I found the netting system difficult to access to maintain and harvest the fruit.

Now I have permanent steel structure over both my vegetable garden and fruit orchard, and I have transplanted all my bushes into these enclosures. They are now much easier to maintain and harvest. I wish I had put in proper enclosures years ago.


The fruit is borne in a cluster along the branches of the bush, with fruit ripening gradually throughout the bunch. I like to wait till the fruit is a beautifully dark blue and sweet to taste before picking them. Once fruit start to ripen, I harvest every second day or so but there is no stress here as they hold for a long time on the bush once they are ripe.

I can harvest 1-2 kg of fruit of each plant, which gives me plenty of fresh fruit during harvest time and heaps to freeze. I usually freeze enough to give me the equivalent of a punnet or 2 of fruit a week for most of the year.

They defrost well with little deterioration in fruit quality.

Occasionally I use the fresh and frozen fruit to make jam and baked goods but prefer just the plain fruit either fresh or thawed from frozen.

Growing Blueberries in pots.

Whilst Blueberries do well in pots, they need a good quality potting mix, one suited to azaleas and camellias is best.

You must ensure they are kept moist all the time with extra care taken during hot dry and windy weather. An application of a soil wetting agent once a month during summer will help retain moisture.

They need to be fertilised regularly with a balanced fertiliser that will encourage strong healthy growth but also support flowers and fruit. A slow release fertiliser recommended for azaleas and camellias again would be suitable.

I would recommend repotting them each year after purchase, into a pot slightly larger than their present pot size until you reach a size of pot that you can easily handle, say 300 mm. Then repot them every 3-4 years.

To be able to keep them in the same size pot when repotting, cut away about 10-20 cm of the root ball and repot with new potting mix to maintain healthy growth and production.


How to preserve your excess crop.

Freeze whole fruit. Check out my blog post on freezing blueberries here. 

Dry them either in a dehydrator in the sun and store in airtight containers in a cool dark place.

Make into jams and jellies.

Make into baked goods- muffins, cakes pies etc and freeze.


Are you thinking of putting in a permanent walk in enclosure for your vegetable garden and fruit orchard?

In my opinion it is well worth the investment.

When I first started growing vegetables the bird population took a few years to find my garden, perhaps they were too busy destroying my fruit orchard to worry about a few tomatoes, capsicums and strawberries. Of course, the more I grew the bigger the bird population seemed to get. From Bower birds to Sulphur Crested Cockatoos and Rosellas all seemed to take up residence in my backyard.

It is a soul-destroying pastime to plant and tend vegetable seedlings and fruit trees to have the crop vanish overnight.

I would not have minded so much if they had just taken some of the crop or even eaten it but, certainly with the Rosellas and Cockatoos, they just seemed to pull off the fruit for the sake of something to do and never actually eat it.

I am all for sharing but cannot stand wanton destruction.

So, for years now I have struggled with different bird deterrent systems including flying hawks, plastic owls, used CDs and foil pie plates, tapes that whistle in the wind, motion detecting sprinklers, and then various netting systems in both the orchard and vegetable garden.

The cheapest and most effective system I came up with was a structure, either a dome or a tunnel shape, made from large poly pipe pushed over the ends of steel posts then covered in bird netting. The netting was then weighted down around the edges.

Here are some images of the netted structures I have used.


Enclosure created by FW FabricationThese systems work but they do have some major flaws.

They are:

In the orchard there is the seasonal struggle of putting netting up before the birds arrive and then trying to get it off the trees, which always manage to grow through the netting, to harvest the crop.

No matter how tight I made the netting I occasionally found a dead bird or snake tangled in it, which is not something I want to be responsible for.

Although netting is supposed to last for years, I was finding I was getting tears in it from year to year and then discovered that the bower birds were eating holes in it at ground level.

I have had to replace the netting several times, which is not a cheap exercise.

In the vegetable garden I had semi-permanent netted tunnels but found them difficult to access and work in. The final straw come when I got tangled up in the netting trying to exit one of the tunnels and had a fall. Not good at any age but when you are getting on a bit it is downright dangerous.

Enough was enough!

So, to the computer I went – researched what companies could build what I wanted and got some quotes.

The biggest decision I had was did I want it built from timber or steel.

Then if steel, did I want welded joints or a coupling type system.

Enclosure by FW Fabrication

I finished up going with a welded steel frame covered in aviary mesh.

Why?

Timber was just too heavy looking and created too much shade as you needed more post than with steel structure.

My experience with treated pine is that it twists, warps and splits and hardwood rots quickly in our acid soil.

A welded steel structure turned out to be the cheapest option and was much easier to hang close fitting doors into, making extra bird proof.

The enclosure over the orchard

It is difficult to come up with a definitive answer as to whether the cost of putting in a permanent enclosure 20 years ago would have been a cheaper option. The real cost of purchasing, trialling and replacing the different deterrent systems and the hours needed to put up, pull down or replace those systems is difficult to calculate retrospectively.

But regardless of the cost of the enclosure, having a structure that I can just walk into is making my gardening much easier, so it is worth it for that alone. The sheer convenience of opening a gate and getting access to the whole vegetable garden and orchard to complete tasks or harvest crops is just blissful. There is also no more anguish over to when to net the fruit trees and blue berries or trying to decide if the crop is ripe enough to pull the netting off and harvest all the crop- just open the gate harvest what you need and walk out again.

I am finding it such a worthwhile investment that if I had my time again, I would have no hesitation in doing it properly and building a permanent structure, seeing it as a worthwhile investment and just a necessary part of developing a home food production system.

So, if you are struggling with critters making off with your beautiful home grown produce then why not do the costing or get a quote for putting in a solid permanent enclosure which will see you having critter free gardening for the rest of your days.

Enclosures created by FWFAB Finigan Wright Fabrication.

Happy Gardening

Kathy

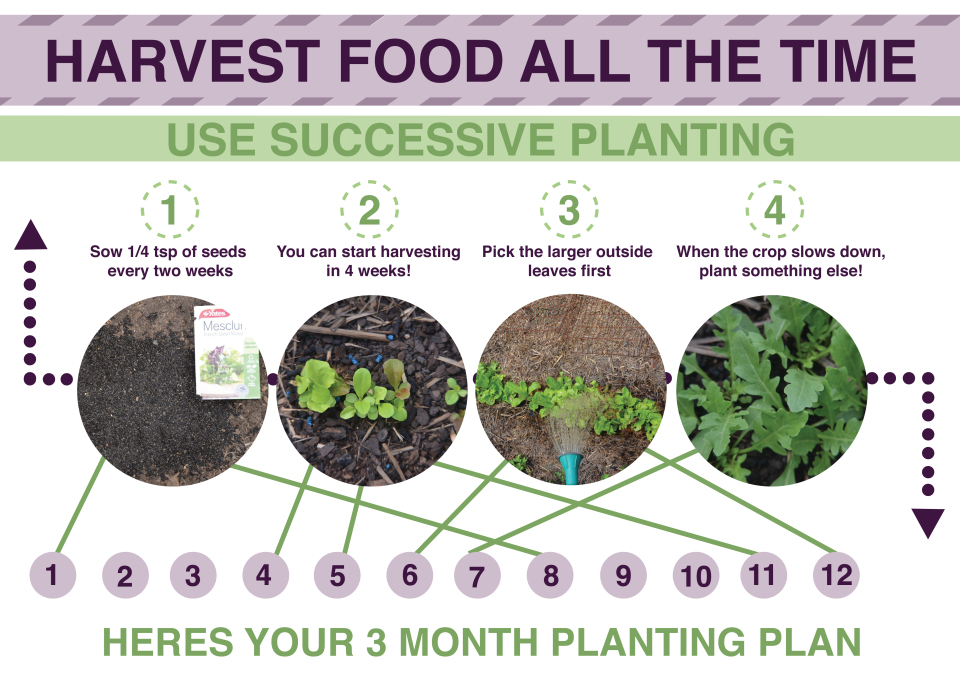
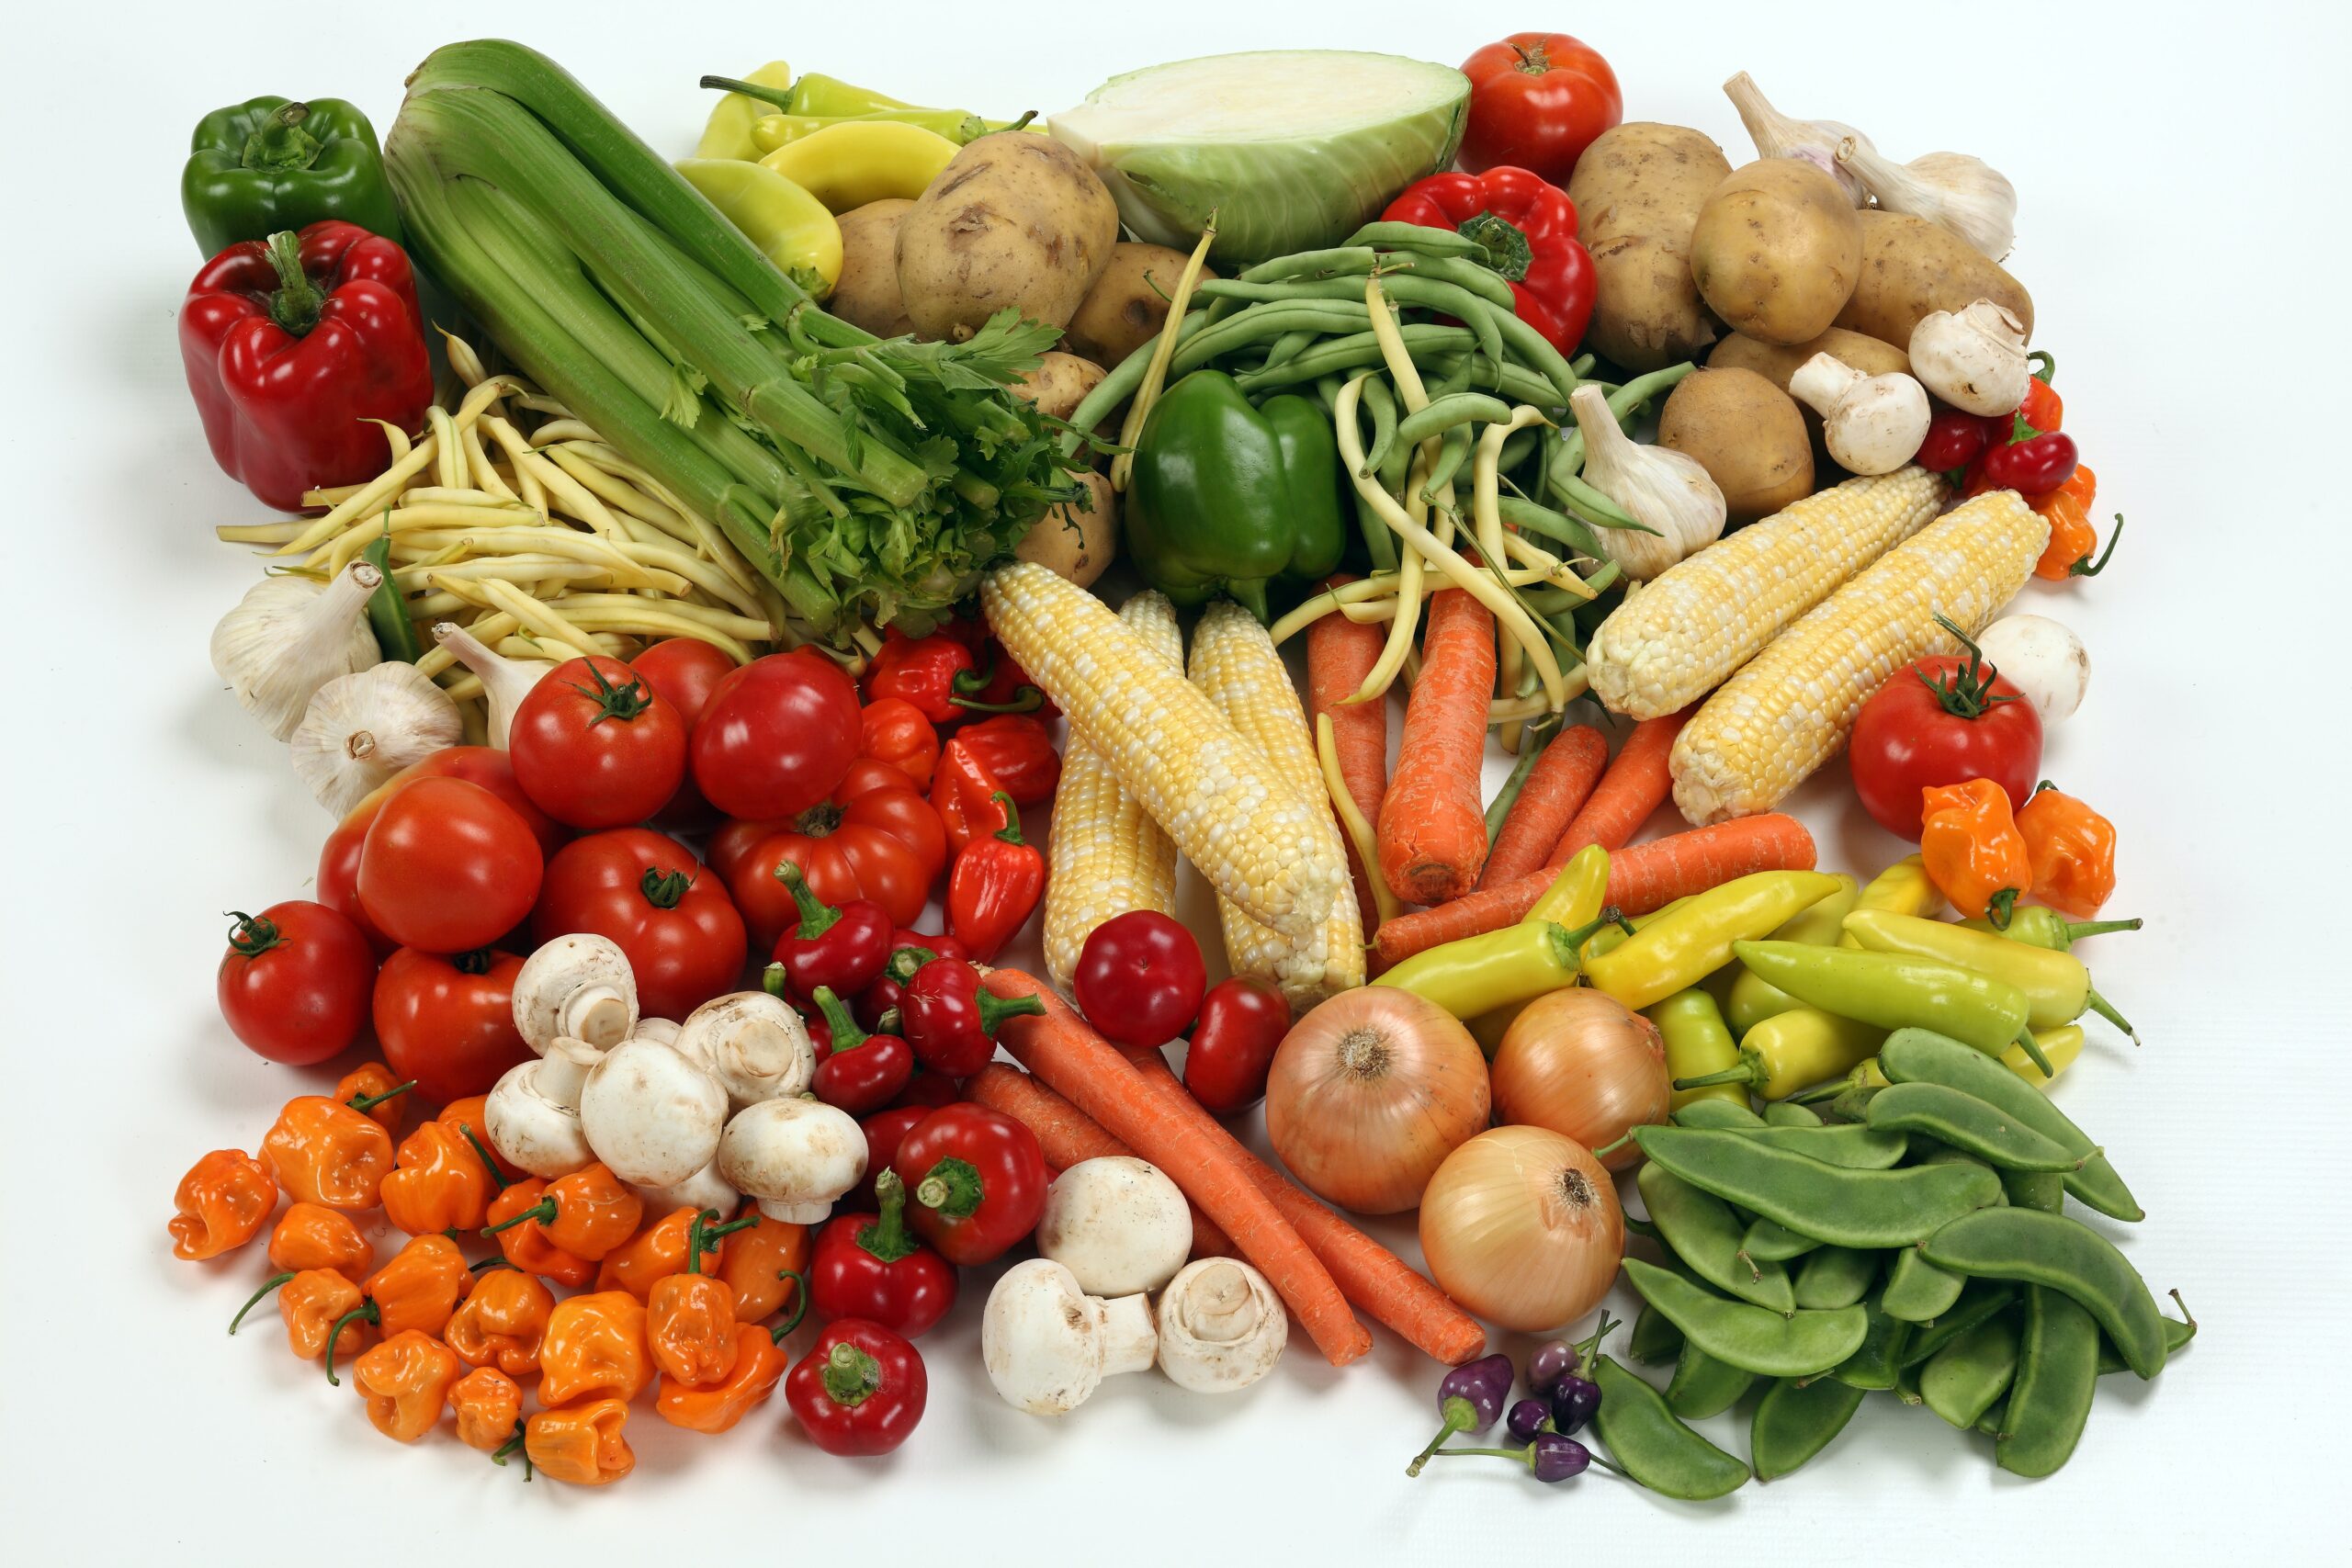
One of the most important things that backyard producers need to learn is how to have a continuous production of food. The feast or famine production of many backyards can be both frustrating and demoralising. Not to mention a waste of energy, mostly your labour, and money.

I have had the experience of planting a whole packet of dwarf beans and then 3 months later picking a bucket of beans a day and the family groaning at the sight of yet another bean dish.

This is not what will keep us motivated to continue to plant and grow our backyard produce.

With a little bit of knowledge and planning, backyard producers can easily develop a production system that allow for the consistent and continual production of healthy fresh and flavoursome food.

The key to continual production is understanding and practicing Successive planting.

Successive planting is a process where you plant small amounts of various crops at regular intervals to ensure a continuous supply of produce.

As one crop is finishing the next crop will be coming into full harvest.

So where to begin

Firstly as with all annual vegetable plantings it is still about planting the right crops in the right season, knowing what temperate seeds germinate at and when they are going to grow their best. It is also good to know how many weeks from planting to harvest and the length of time a crop will produce. All these things will help you determine the interval time between your plantings.

You may also have the opportunity, with some crops to plant different varieties, with some germinating and growing earlier in the season or maturing in less time. Both will extend your harvest.

The final thing to consider is making sure you have room for subsequent planting.

It is tempting to keep planting until all available space is taken up and then just maintain and harvest, but this will not give you a continuous harvest, back to the feast or famine situation.

So for each crop you wish to plant successively leave enough space to do a number of planting throughout the season.

To avoid weed contamination in the bear ground cover with straw or other mulch. Or once a crop has come to the end of its most productive stage pull them out and replacing straight away with another crop (remembering the principles of crop rotation) this way you are efficiently utilising all productive areas to their full potential.

It can be done for most crops that we would normally grow in our productive gardens. The exemption would be crops like onions and garlic which are planted and harvested at specific times.


So an example of a successive planting of a warm season crop such as beans would go like this:

Beans germinate once the soil has warmed up slightly, say early to mid- October and will not crop well once you start getting cold autumn nights say mid-April,  giving us nearly  six months where you can germinate, grow and  harvest beans. The key is to plant small amounts often- beans take about 12 weeks to crop and then crop for about two to three weeks so you need to plant every 2 to 3 weeks to get a continuous harvest.

The next concept to understand is amount, about 12 dwarf plants will give you 2 to 3 feeds (enough as a side dish for 3 to 4 adults) of beans a week. So to allow for non-germination and thinning of weak plants, if you plant 16 bean seeds every 2 weeks you will have a continuous manageable amount of crop for six months of the year.

Climbing beans

Some other examples:

Stagger corn by planting you next crop when the previous one is about 5 to 6 cms high

Sow some mixed lettuce and rocket every second week to have a continuous supple of Musculm mix for salads

Between October and April sow carrots every month to ensure a continuous supply all year.

All this information can help you develop a successive planting guide.


Or if this all seems too hard, just try to plant a variety of crops every week. It can be as simple as calling into your local nursery of your way home from work Friday afternoon, buying 2 or 3 punnets of whatever they have is stock, that you would like to eat and planting them out over the weekend.


Here is a table of common staples that I grow successively.

The temperatures are only a guide so experiment.

Remember if your soil temperature is not warm enough to germinate your seeds in situ you can buy seedlings and plant them or start seedlings indoors. They may grow a bit slower until the soil warms up but you will still be getting a head start on the waiting until the soil is warm enough.

Warm season crops          
crop Germination temperature Approximate weeks to harvest Interval between plantings Number of planting per season Number of seeds /seedlings to plants at each planting based on my tastes and for a family of 4
Beans dwarf and climbing 15-26 c 12-14 3 6-8 12-16 seeds
Beetroot 10-29 c 8-14 can be used at various sizes 3 10 20
capsicum 29 10-12 4 4 3-4
carrot 26 10-12 4 6-7 ¼ packet seed
Corn, Sweet 35 10-14 3 4 8-10
coriander 35-70 4 2 20 20
cucumber 18-37 10 4 4 3
Eggplant 29 10-14 4 4 3
Lettuce musclum 2-21 6-8 2 20 ¼ packet seed or scatter seed along 50 cm row and  thin
Rocket 2-21 4 2 20 ¼ packet seed or scatter seed along 50 cm row and  thin
tomato 15-26 10-12 4 5 2-4
Cool season crops
Broccoli cauliflower 10-25 10-12 2 10 4
leeks 10-20 10- 12 2 2 40 use at various sizes
Peas, snow, sugar snap or bush 10-20 10-12 2 10-12 12
potato Grow best at temperatures  b/w 15 to 25 c 12-14 4 6

3 in spring 3 in autumn

10 sprouted tubers
Spring onion 15-23 10-12 4 10 20
spinach 10-20 6-12 2 10 10

www.home-and-garden-place.com